Tuesday, January 14, 2014

Building a native iOS graphing engine for Pocket Weather 4

One of my favourite iOS apps is Pocket Weather Australia by Shifty Jelly who are a friendly little development team based in Adelaide. So it was an honour when they approached me to lend them a hand with development of their new version, overhauled and optimised for iOS 7: Pocket Weather 4.

Requirements


Specifically, my scope was to build a new, modern graphing engine for them, to replace the old legacy graphing code they had been using for years. An app like Pocket Weather lives or dies based on (a) Forecast data quality; and (b) Forecast data visualisations with rich graphs. Pocket Weather does both really well, visualising forecast data in a multitude of forms to cover many use cases. I couldn't help with their forecast data quality (which was already very high and even better in PW4) but I was happy to build a modern new high performant interactive graphing engine to cover their visualisation needs.

The graphing engine needed to support both static graphs as well as smooth scrolling interactive graphs, to cover all the visualisations that Pocket Weather 4 required. On iPhone, five main graphs were needed:
  • "Today": a static graph charting both air and "feels like" temperature forecasts, with "chance of rain" overlays.
  • "Detailed Outlook": a static graph charting forecast for the next two days, similar to the Today graph.
  • "Tide Times": a line chart of tide low/high forecast times, with edges nicely smooth out.
  • "Interactive Timeline": a scrolling graph charting air and "feels like" temperature forecasts, plus rain overlays, for the next 7 days.
  • "Interactive Tide Times": a scrolling graph of tide low/high forecast tides for the next few weeks.
Screenshots of two of the static graphs can be seen above, near the top. The interactive graphs are shown below.

Solution


There are a few iOS graphing libraries around that produce good results, both commercial and open source. However, third party library dependencies are always a trade off between convenience and managing extra baggage. Plus the ability and/or cost to customise them to meet requirements varies quite a bit. Based on the requirements, my preference was to hand-roll a graph rendering engine using native Core Graphics and Core Animation frameworks, rather than bring in a third party graphing library. Having had already done this a few times for previous projects, I was confident that we could get good results in a short time. This matched Shifty Jelly's preference also, as they would end up with modern code that they could own, manage and continue to customise themselves.


Technical


A common factor between all the required graphs was that they were all line graphs, charting either one or two lines of data, drawn with various styling options. As such it made sense to encapsulate line chart rendering in a class configurable enough to be shared by all the graph views. As some views would be drawing into UIView contexts (for static graphs) and others would be drawing into contexts at the CALayer level (for scrolling graphs, more on this below) that meant that the chart renderer could be a shared NSObject subclass, without any knowledge of the UIKit or CALayer levels. The chart renderer would talk Core Graphics, accepting a CGContext to render in to.

Above is an abstract diagram of the class architecture. Each graph view is a UIView subclass, with common elements abstracted into shared base classes, down to one base class for static graphs, and one for interactive graphs. Each graph view contains a chart renderer instance, configured appropriately for the particular graph type. Chart renderer objects were ultimately responsible for actually drawing the line graphs into specified CGContexts.

The static graph views were relatively straight forward. On "needs display" their drawRect: method delegates drawing to the chart renderer, passing down the CGContext to draw into.

The interactive graph views were a little more complex. They were very wide scrollable graphs. Rendering a large scrollable view is not possible, and would be very inefficient even if it was. The answer was to use a CATiledLayer to render the graph into tiles, on demand as the view is scrolled. CATiledLayer works great for this. Or would have, if it wasn't severely broken in iOS 7. In the end I had to roll my own CATiledLayer clone to get the job done, but the result was the same (more on this below).

Shown here are two images of an example scrollable graph view. The first image shows what the graph looks like rendered on screen. The second shows the view explosion, with all the subviews Revealed. You can see the large scrollable view, which cannot be snapshot by Reveal, but at runtime is rendered as horizontal tiles. The tiling layer renders tiles on demand, only drawing tiles as they become visible. Even then, rendering is performed asynchronously so as not to interrupt scrolling performance. Rendered tiles are then cached so they don't have to be drawn again unless necessary.


Challenges


As mentioned above, CATiledLayer is unfortunately broken in iOS 7.0 (rdar://15402066). It suffers a severe problem of not redrawing purged tiles in some cases. Easily reproducible and not shippable. After a discussion with Apple engineers via a TSI I concluded that the only practical current solution was to avoid CATiledLayer and write my own equivalent. I did that and it worked well for our case.

Another interesting challenge was the requirement to smooth the curves of the tide graphs, while also tracking the curved line path with a circular overlay when the graph is being scrolled. See the video below for an example of what I mean.


The tide data was a simple data set of low tide/high tide forecasts, in time order. For example: [low tide, high tide, low tide, high tide, ...]. By default the data would be graphed with sharp edges, as shown below in the first image. Shifty Jelly's rockstar designers understandably requested that the line be smoothed out, as shown in the second image below.
Techniques to smooth curves in a line are fairly well known and I used a Catmull-Rom spline to smooth the line.

The Catmull-Rom spline generated enough points to create a CGPath for Core Graphics to draw a smooth line. However, it didn't generate enough points to calculate the exact Y position needed for the circular overlay for every X position of the graph. The solution here was to interpolate between the curved line points to generate a set of (X, Y) points with just enough granularity for every X position of the graph. This calculation is done once for a data set + graph layout configuration and cached. Then, while scrolling, a lookup of overlay Y position for any X position is direct and instant, allowing the circular overlay to track the graph line.

Summary


While hand-rolling a graph engine may sound like a lot of work, in practice with a good knowledge of Core Graphics and Core Animation to do all the heavy lifting, the amount of code required is not terribly large.

We were all very pleased with the results we got from building a native graph engine ourselves. With the engine now built and shipped, modifications are fast and easy to do as the library is clean and well understood.

The requirements for the iPad interface were not known to me while building the graph engine. In fact, I didn't even know how the iPad build would look until PW4 shipped. I was pleased to see that the iPad interface was built around the scrolling forecast graph, very cleverly designed. The graphing engine scaled up to the iPad interface with little extra effort.

A big thanks to Shifty Jelly for bringing me on-board for this part of the project, it was a pleasure to work with them.


Thursday, September 26, 2013

EasyRes

Announcing EasyRes, a Mac OS X fast screen resolution switcher with live animated previews.

EasyRes is my new Mac app, a little utility I developed for myself, before polishing it up and releasing it in the Mac App Store. I found that I was switching resolutions a lot more frequently on the Retina MacBook Pro, which has more usable resolutions due to the high pixel density. Not impressed with the quality of the existing apps out there, I wrote my own.


Although a relatively simple app, which aims to do one thing right, it does include a bunch of useful features:
  • Live animated previews of how windows will be sized for each screen resolution by simply mousing over the menu.
  • Quick access to screen resolutions from the menu bar.
  • Resolutions and previews are shown for all active screens.
  • Retina smart: Resolutions are grouped by Retina and non-Retina modes.
  • HDTV smart: TV resolutions such as 1080p, 1080i, 720p are all listed when available, including refresh rates such as 50Hz/60Hz, making it easy to find the right HDTV resolution.
  • Recently selected resolutions are remembered for each screen.
  • User-friendly labels are displayed beside resolutions, such as "Best for Retina Display", "Native", "1080p NTSC".
  • Labels can be added and customised for any resolution on any screen, making it easy to find your favourite resolutions.
  • Option to automatically launch at login.

You can see EasyRes in action in a YouTube video demo.


Friday, June 7, 2013

Reveal Public Beta


My friends at Itty Bitty Apps have released an awesome new tool for iOS developers. Reveal is a Mac OS X application for introspecting iOS apps at runtime. It allows you to visualise and modify view hierarchies in real-time. The view structure can be "exploded" in 3D, with powerful tools for drilling down and isolating the parts of the hierarchy that need attention.

I have been helping the Itty Bitty Apps team develop Reveal for the past 6 months or so. My focus has been on the 3D view hierarchy explosion visualisation, using Scene Kit & OpenGL. We are working hard on getting it all polished and looking awesome for the 1.0 release.

Reveal is currently free during the public beta phase. Take a look at http://revealapp.com/


Wednesday, March 20, 2013

Bluetooth LE with CoreBluetooth Presentation

At February's Melbourne Cocoaheads I gave a presentation about integrating Bluetooth LE peripherals with iOS devices using Apple's Core Bluetooth framework.

Bluetooth LE is the new Bluetooth Low Energy (aka Bluetooth Smart) protocol introduced as part of Bluetooth 4.0. Apple embraced Bluetooth LE early on, adding support for it in the iPhone 4S and almost every Apple device since then, including iPads and Macs.


In the presentation I demonstrated an example iPhone app that connected to two Bluetooth LE peripherals simultaneously. It connected to a Wahoo Fitness Blue HR heart rate strap, measuring my heart rate live as I gave the talk. It also connected to a TI SensorTag, measuring both temperature and acceleration of the device. You'll see why when you watch the presentation.

The TI SensorTag is a great little Bluetooth LE device, containing a bunch of sensors that can all be read over a Bluetooth LE connection. It is handy for development and only costs US$25 direct from Texas Instruments. The sensors include:

  • Temperature (IR and ambient)
  • Humidity
  • Pressure
  • Accelerometer
  • Gyroscope
  • Magnetometer
  • plus 2 digital buttons

By the way, the technical issue I had with the SensorTag during the presentation was fixed by TI in a firmware update (released the morning after my presentation...).

I haven't released the source code to the Coffee Addict demo app I used in the talk yet. I hope to do so in the near future, when I tidy up a few things.

You can watch my presentation on Vimeo:
Bluetooth LE with CoreBluetooth.

You can view the presentation slides on Speaker Deck.


Monday, December 10, 2012

Introducing CMUnistrokeGestureRecognizer

How would you go about recognising a gesture like this star shape in an iOS app?
This was the problem posed to me recently while working on a project. I knew I wasn't the first to need to solve this type of problem. For example, the popular Infinity Blade series of iOS games used a shape drawing gesture for spell casting.


Looking further back into the past, you might remember Palm OS Graffiti used a similar gesture recognition technique for text input.
Something that all these gestures have in common is the requirement to recognise shapes drawn from a single path. That is, the path drawn by a user between putting their finger down and lifting their finger up.

Knowing this problem had obviously been solved, I began researching techniques for single path recognition and that's when I found...


$1 Unistroke Recognizer

Created by three clever chaps at the University of Washington back in 2007, the $1 Unistroke Recognizer was designed to recognise single path (unistroke) gestures, exactly what I was looking for. Not only that, but design goals for the technique make it an ideal candidate for use in mobile applications:


  • Resilience to movement & sampling speed
  • Rotation, scale, position invariance
  • No advanced maths required (e.g., matrix inversions, derivatives, integrals)
  • Easily implemented with few lines of code
  • Fast enough for interactive use
  • Define gestures with minimum of only one example
  • Return top results ordered by score [0-1]
  • Provide recognition rates competitive with more complex algorithms

A pretty bold set of requirements, but it looks like they were able to achieve them all. The creators published their paper describing their technique and included full pseudocode. Their project website also includes a demo implementation written in JavaScript so you can test it out live in the browser.

$1 Unistroke Recognizer website
$1 Unistroke Recognizer paper (PDF)


CMUnistrokeGestureRecognizer

CMUnistrokeGestureRecognizer is my port of the $1 Unistroke Recognizer to iOS. I'm not the first to implement this recogniser in Objective-C but none of the existing implementations met my requirements. I wanted the $1 Unistroke Recognizer to be fully contained within a UIGestureRecognizer, with as simple an API as possible.

So the CMUnistrokeGestureRecognizer implements the $1 Unistroke Recognizer as a UIGestureRecognizer. It features:

  • Recognition of multiple gestures
  • Standard UIGestureRecognizer callback for success
  • Template paths defined by UIBezierPath objects
  • Optional callbacks for tracking path drawing and recognition failure
  • Configurable minimum recognition score threshold
  • Option to disable rotation normalisation
  • Option to enable the Protractor method for potentially faster recognition
The core recognition algorithm is written in C and is mostly portable across platforms. I say "mostly" as it uses GLKVector functions from the GLKit framework for optimal performance on iOS devices. GLKMath functions take advantage of hardware acceleration such as the ARM NEON SIMD extensions, so I like to use them. It wouldn't take much work to substitute the vector functions if someone wanted to use the core C implementation on another platform.

The CMUnistrokeGestureRecognizer implementation sits on top of the core C library and provides the Objective-C/UIKit interface.

To use it, add the CMUnistrokeGestureRecognizer project to your own as a subproject and add the library to your target. In your source file, import the main header:

#import <CMUnistrokeGestureRecognizer/CMUnistrokeGestureRecognizer.h>

In your code, define one or more paths to be recognised. Create an instance of CMUnistrokeGestureRecognizer, register your paths, then add it to a view.

Your callback method will be called whenever a gesture is successfully matched against the template paths you registered.

Here's an example of the key points:

- (void)viewDidLoad
{
    [super viewDidLoad];

    // Define a path to be recognised
    UIBezierPath *squarePath = [UIBezierPath bezierPath];
    [squarePath moveToPoint:CGPointMake(0.0f, 0.0f)];
    [squarePath addLineToPoint:CGPointMake(10.0f, 0.0f)];
    [squarePath addLineToPoint:CGPointMake(10.0f, 10.0f)];
    [squarePath addLineToPoint:CGPointMake(0.0f, 10.0f)];
    [squarePath closePath];
    
    // Create the unistroke gesture recogniser and add to view
    CMUnistrokeGestureRecognizer *unistrokeGestureRecognizer = [[CMUnistrokeGestureRecognizer alloc] initWithTarget:self action:@selector(unistrokeGestureRecognizer:)];
    [unistrokeGestureRecognizer registerUnistrokeWithName:@"square" bezierPath:squarePath];
    [self.view addGestureRecognizer:unistrokeGestureRecognizer];

}

- (void)unistrokeGestureRecognizer:(CMUnistrokeGestureRecognizer *)unistrokeGestureRecognizer
{
    // A stroke was recognised
    
    UIBezierPath *drawnPath = unistrokeGestureRecognizer.strokePath;
    CMUnistrokeGestureResult *result = unistrokeGestureRecognizer.result;
    NSLog(@"Recognised stroke '%@' score=%f bezier path: %@", result.recognizedStrokeName, result.recognizedStrokeScore, drawnPath);
}

See the included demo app for a more detailed example. The demo includes all the template shapes used by the original creators in their own JavaScript demo. The demo app allows you to test the recognition engine, as well as create new template shapes and export shapes out as code for inclusion in your own projects. The demo app is universal for both iPhone and iPad.


CMUnistrokeGestureRecognizer is open source, released under a MIT license. Get it from https://github.com/chrismiles/CMUnistrokeGestureRecognizer

I look forward to seeing what developers create with it.

Thursday, October 18, 2012

OpenGL ES with iOS 5 Part 2: Rendering a masterpiece – Swipe Conference 2012

At September's Swipe Conference I gave two talks on OpenGL with iOS. The first talk, "OpenGL ES with iOS 5 Part 1: Learning to draw" was an introduction to OpenGL ES and GLKit. The second talk covered rendering effects in OpenGL using GLKit, looking at the OpenGL debugging and profiling tools that ship with Xcode, and demonstrating how OpenGL can be used for some fancy segue transitions.
In more detail, my talk "OpenGL ES with iOS 5 Part 2: Rendering a masterpiece" covered:

  • Rendering textured triangles using GLKTextureLoader and GLKBaseEffect;
  • Creating cubemaps using GLKTextureLoader;
  • Rendering skyboxes using GLKSkyboxEffect;
  • Rendering reflection map effects using GLKReflectionMapEffect;
  • Demonstration of the Xcode OpenGL ES frame debugger;
  • Demonstration of the OpenGL ES Driver and Analyzer instruments;
  • Demonstration of the OpenGL ES Performance Detective;
  • Performance recommendations specific to OpenGL ES on iOS devices;
  • Demonstration of some fancy custom storyboard segue transitions using OpenGL ES
The slides from the talk are available at https://speakerdeck.com/chrismiles/opengl-es-with-ios-5-part-2-rendering-a-masterpiece or http://chrismiles.info/presentations/SwipeConf-2012-OpenGL-ES-iOS5/Swipe-2012-OpenGL-ES-iOS5-Part2.pdf [PDF]

The demo apps used in the talk are all released open source.

SwipeOpenGLTriangles demonstrates rendering textured triangles  – https://github.com/chrismiles/SwipeOpenGLTriangles

Swipe3D demonstrates GLKSkyboxEffect, GLKReflectionMapEffect, cubemap textures and indexed vertices – https://github.com/chrismiles/Swipe3D

FancySegue shows how to build custom segue transitions using OpenGL – https://github.com/chrismiles/FancySegue
All the sample apps are universal and support all orientations.

Also see my post about the first talk: OpenGL ES with iOS 5 Part 1: Learning to draw – Swipe Conference 2012.

Update: the presentation video is now available online at https://www.youtube.com/watch?v=dkqBjsEpt5g

Tuesday, October 2, 2012

OpenGL ES with iOS 5 Part 1: Learning to draw – Swipe Conference 2012

In September I presented two talks at Swipe Conference in Sydney. The first talk, "OpenGL ES with iOS 5 Part 1: Learning to draw", was an introduction to OpenGL ES and GLKit, aimed at iOS developers new to OpenGL programming.
In the talk I used a simple demo app, SwipeOpenGLTriangles, to demonstrate OpenGL ES rendering concepts with GLKit, such as:


  • Setting up an OpenGL ES scene using GLKViewController + GLKView
  • Rendering triangles (GL_TRIANGLES) and meshes made of triangles
  • Applying vertex colours, using GLKBaseEffect
  • Applying lighting, using GLKBaseEffect
  • Applying texturing, using GLKBaseEffect and GLKTextureLoader
  • Using Vertex Array Objects (VAO) and Vertex Buffer Objects (VBO)
  • Using interleaved vertex arrays (IVA)
  • Animating vertex positions (tap screen to animate between flat triangles and 3D open box shape)
  • The sample app is universal and supports all orientations.


The full source to the demo app is released open source (MIT licensed) at https://github.com/chrismiles/SwipeOpenGLTriangles


The slides from the talk are available at https://speakerdeck.com/chrismiles/opengl-es-with-ios-5-part-1-learning-to-draw or http://chrismiles.info/presentations/SwipeConf-2012-OpenGL-ES-iOS5/Swipe-2012-OpenGL-ES-iOS5-Part1.pdf [PDF].

Update: The presentation video is now online at https://www.youtube.com/watch?v=s6VCaFQFBtM

Friday, May 18, 2012

CMTraerPhysics CocoaHeads Presentation

In March I gave a presentation at Melbourne CocoaHeads about my open source project CMTraerPhysicsCMTraerPhysics is a spring physics engine that I ported to Objective-C/Cocoa, along with some interesting demos for iOS.

Watch "Chris Miles presents CMTraer Physics" on Vimeo (embedded below if your browser supports it).


See the slides at https://speakerdeck.com/chrismiles/cmtraerphysics-melbourne-cocoaheads-march-2012

Thursday, May 10, 2012

Announcing EZForm 1.0 - iOS form handling & validation library

Announcing EZForm 1.0, my open source form handling and validation library for iOS.


The primary goal of EZForm is to simplify form handling in iOS apps, while not enforcing any constraints on the layout and design of the form UI.


EZForm is designed to be decoupled from your user interface layout, leaving you free to present your form UI any way you like. That doesn't mean EZForm won't integrate with your UI. You tell EZForm which of your controls and views you want to handle each form field, and EZForm will take care of input validation, input filtering and updating views when field values change.


EZForm features:
  • Form field types including: text, boolean, radio.
  • Block based validators. User-defined input validation rules can be added to fields as block objects. Some common validators are included with EZForm.
  • Block based input filters. Input filters control what can be entered by the user. For example, an input filter could be added to a text field to allow only numeric characters to be typed. Some common input filters are included with EZForm.
  • Standard input accessory and field navigation. A standard input accessory can be added to text fields by EZForm with one method call. It adds a bar to the keyboard with field navigation and done buttons, similar to Mobile Safari's input accessory. Navigation between fields is handled automatically by EZForm.
  • Automatic view scrolling to keep active text fields visible. With the option enabled, EZForm will adjust a scroll view, table view or arbitrary view to keep the text field being edited on screen and not covered by a keyboard.
  • Invalid field indicators. EZForm can automatically show invalid indicator views on text fields that fail validation. Invalid indicator views can be user-supplied or supplied by EZForm.
EZForm comes with full API documentation, which can be installed as an Xcode document set, for reading within Xcode's document viewer.

EZForm is convenient to use for both simple and complex forms. The source includes a demo app containing both simple and more complex form examples.


Get EZForm from https://github.com/chrismiles/EZForm

Friday, April 27, 2012

CMTraerPhysics – Spring physics engine for iOS


Announcing my port of the Traer v3.0 physics engine to Objective-C/Cocoa: CMTraerPhysics.


Traer Physics is a particle system and spring physics simulator, originally created by Jeffrey Traer Bernstein. It is used to simulate spring and attraction forces between particles, and can be used for some interesting effects.


The CMTraerPhysics source includes a sample iOS app containing a number of physics demos, including a Wonderwall-like demo, a cloth physics demo and a spider web demo.  See videos of some of the demos on YouTube.


The demo app is universal so you can play with the physics demos on both iPhone and iPad. The source for all demos is included with the project. Some demos are rendered with OpenGL ES 2.0, some with Core Animation.


The CMTraerPhysics source is available on github at https://github.com/chrismiles/CMTraerPhysics and is released open source under the MIT license.


Tuesday, March 27, 2012

Paper Baron

Late last year I worked on a cool little iPhone game for the Australian Air Force Defence Jobs: Paper Baron. The development was managed by Millipede Creative Development, and the project was produced & designed by GPYR Melbourne.
Paper Baron is a 2D side scrolling game. In the game, you glide a 3D rendered paper plane through a world of paper constructed obstacles and scenery, aiming to fly for as far as possible.


The game adds a social element in the form of user-created Airstrips. Airstrips are basically geolocation fixed leader boards. Any user can create an Airstrip at their physical location. If they are physically close enough to an Airstrip, users can launch their plane from it to challenge the Airstrip's leader board.


Paper Baron has already been awarded with a Gizmodo App Of The Day award.


You can see the game in action by watching the Paper Baron Trailer on YouTube.


Paper Baron is free in the App Store, check it out.


Wednesday, February 1, 2012

My Cocoaheads talk on Augmented Reality with iOS

At the November Melbourne Cocoaheads meeting I gave a talk about Augmented Reality with iOS.
A video of the talk is embedded below (or watch on Vimeo) and the slides are available online.


In the talk I review the current set of available libraries for AR processing on iOS. I run through them relatively quickly, to keep the talk moving, but I do give live demos of each library. The libraries I cover are:


Commercial:
Open Source:


View the slides.


Monday, January 23, 2012

Working With a Famous Blue Hedgehog

Late last year I had the honour of working with one of the most well known computer game characters of all time, the famous blue hedgehog, incorporating him into an interactive augmented reality app for iPhone.
The app is a promotional mini game for Sonic's 20th Anniversary. It is an augmented reality game where users attempt to capture Sonic as he races around, usually too fast for human eyes to see.
We used the String library for augmented reality image recognition handling, a library I highly recommend. String processes the camera input in real time and provides orientation matrices of any of the pre-defined images that are recognised. The app uses this information to render a 3D animated Sonic running through the scene, oriented relative to the marker with 3D perspective. Look at the marker straight on and Sonic runs past in front of you. Look at the marker from a sharp angle and it is possible to see Sonic running in from a distance (or running away into the distance, on the other side).
Update: Unfortunately the promotion has ended and the app is no longer available for download from the App Store. See an archive of the app details.

Friday, December 23, 2011

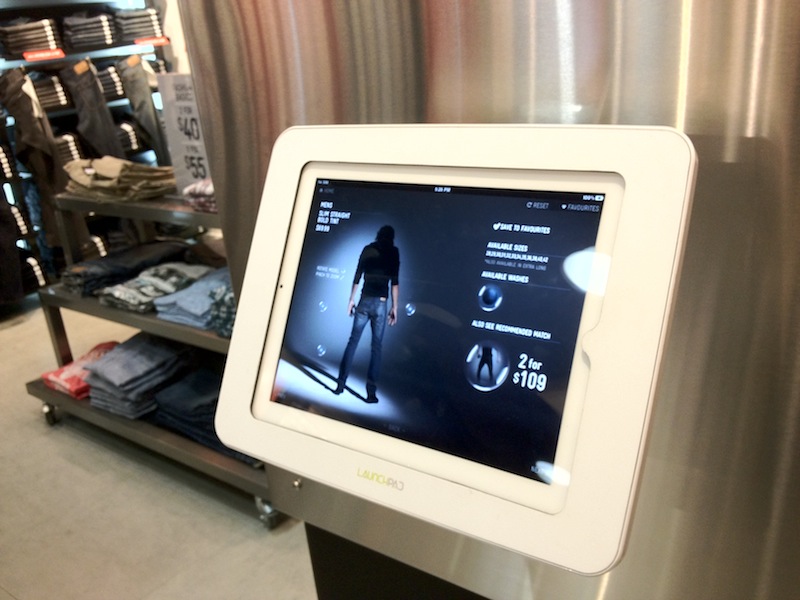
Cocoaheads Talk: Developing an iPad in-store interactive product browser

Earlier in the year I was hired to build an interactive product browsing iPad app for a large clothing retailer. The app was deployed in brick & mortar stores, kiosk-style. It ended up being a technically interesting project, requiring simulation of bubble physics and careful optimisation to be able to quickly scrub full iPad screen resolution photographs of the modelled clothing, with panning and zooming up to 4x resolution. In total, 840 high resolution (4x) images were embedded.


In April 2011 I gave a talk at Melbourne Cocoaheads about the project, detailing some of the technical challenges and how I solved them. You can watch this talk on Vimeo (embedded below).


Proudly, the app won a FWA Mobile Of The Day (MOTD) Award in October.

Tuesday, July 12, 2011

Core Data debugging with SQLite

Core Data is designed to be a black box. Under the hood on iOS it (normally) uses a SQLite database for data persistance. The use of SQLite is an implementation detail and not one we are encouraged to worry about. However, in practice this detail can be very convenient and accessing the SQLite database directly can be a handy tool for debugging & testing. This post will describe how to do that.


Sample App


All the example code in this post can be found in a demo app, introduced in the previous post, Organising Core Data for iOS.


Locating the Store


In the app delegate class look for the method that creates the NSPersistentStoreCoordinator. Apple's template has it in the persistentStoreCoordinator method.  This is where the store path is passed to the NSPersistentStoreCoordinator (as a URL). Add an NSLog() statement to output the path to the console.


For example, here is a snapshot of the persistentStoreCoordinator method as generated by Apple's template; I added the NSLog() line:


- (NSPersistentStoreCoordinator *)persistentStoreCoordinator
{
    if (__persistentStoreCoordinator != nil)
    {
        return __persistentStoreCoordinator;
    }
    
    NSURL *storeURL = [[self applicationDocumentsDirectory] URLByAppendingPathComponent:@"OrganisingCoreData.sqlite"];
    NSLog(@"Core Data store path = \"%@\"", [storeURL path]);

    NSError *error = nil;
    __persistentStoreCoordinator = [[NSPersistentStoreCoordinator alloc] initWithManagedObjectModel:[self managedObjectModel]];
    if (![__persistentStoreCoordinator addPersistentStoreWithType:NSSQLiteStoreType configuration:nil URL:storeURL options:nil error:&error])
    {
    ...

In the simulator you'll get output something like:


2011-07-01 22:13:25.971 OrganisingCoreData[14217:207] Core Data store path = "/Users/chris/Library/Application Support/iPhone Simulator/4.3.2/Applications/22CD429E-ADD2-4AAA-9C9E-5E57828A6FF8/Documents/OrganisingCoreData.sqlite"


SQLite


Now you've got the Core Data store path, you can hand it to a SQLite client and poke around. Grab a GUI SQLite client if you like, but I recommend the command-line client as it is built-in and easy to use. Open Terminal and run "sqlite3" pasting in the store path as argument.


$ sqlite3 "/Users/chris/Library/Application Support/iPhone Simulator/4.3.2/Applications/22CD429E-ADD2-4AAA-9C9E-5E57828A6FF8/Documents/OrganisingCoreData.sqlite"
-- Loading resources from /Users/chris/.sqliterc
SQLite version 3.6.12
Enter ".help" for instructions
Enter SQL statements terminated with a ";"
sqlite> .tables
ZDVD          ZPERSON       Z_METADATA    Z_PRIMARYKEY


You can view all the database tables with the ".tables" command. You will see each Core Data entity represented by a table, named after the entity but prefixed with "Z" and all caps. My example app contains a Core Data model with two entities, DVD and Person (see model layout image below). In SQLite we see a table for each entity, "ZDVD" and "ZPERSON". You will also see two extra tables, "Z_METADATA" and "Z_PRIMARYKEY". These are used by Core Data for administration.


You can examine the schema of each table with the ".schema" command. SQLite shows the "CREATE" command for each. This can be useful to see the types that Core Data picks for each field as well as how any indexes are configured.


sqlite> .schema ZPERSON
CREATE TABLE ZPERSON ( Z_PK INTEGER PRIMARY KEY, Z_ENT INTEGER, Z_OPT INTEGER, ZUSERNAME VARCHAR, ZNAME VARCHAR );
CREATE INDEX ZPERSON_ZUSERNAME_INDEX ON ZPERSON (ZUSERNAME);
sqlite> .schema ZDVD
CREATE TABLE ZDVD ( Z_PK INTEGER PRIMARY KEY, Z_ENT INTEGER, Z_OPT INTEGER, ZOWNER INTEGER, ZPURCHASEDATE TIMESTAMP, ZTITLE VARCHAR );
CREATE INDEX ZDVD_ZOWNER_INDEX ON ZDVD (ZOWNER);


Tables contain a column for each entity attribute, names based on the attribute names, all caps and prefixed with "Z". Some extra administrative tables are also present, each prefixed with "Z_". You may also notice that all tables automatically get a primary key as "Z_PK".


Any one-to-one or one-to-many relationships are tracked in a column, like "ZOWNER" in the example. Many-to-many relationships are tracked in separate tables, automatically managed by Core Data.


You can query the data using all the usual SQL commands.

sqlite> SELECT * FROM ZPERSON;
Z_PK        Z_ENT       Z_OPT       ZUSERNAME   ZNAME      
----------  ----------  ----------  ----------  -----------
1           2           3           chris       Chris Miles
sqlite> SELECT ZUSERNAME,ZPURCHASEDATE,ZTITLE FROM ZDVD LEFT JOIN ZPERSON ON ZPERSON.Z_PK=ZDVD.ZOWNER WHERE ZUSERNAME='chris';
ZUSERNAME   ZPURCHASEDATE  ZTITLE      
----------  -------------  ------------
chris       279979769      The Hangover
chris       -61041031      Terminator 2


You can also modify the data, if care is taken not to invalidate any of the Core Data administrative fields, or create broken relationships or other broken states.


Recently I added a weekly progress graph to an iPhone project and part of the testing required data that was generated over the period of many weeks. Waiting a few weeks until real data was collected was out of the question, so I simulated accelerated use by repeatedly advancing the date field values by a few days at a time and restarting the app each time.


For example, in my demo app I set a purchased date of 2009-11-15 for "The Hangover", which is stored as 279979769 (seconds since a reference date).  By accessing the Core Data store directly I can advance this date by one week with the SQL query:


sqlite> UPDATE ZDVD SET ZPURCHASEDATE=ZPURCHASEDATE+(60*60*24*7) WHERE Z_PK=1;


After relaunching the app the purchased date is now shown as "2009-11-22".


Core Data Faulting


In my example above I mentioned relaunching the app after modifying the SQLite store directly. Modifying the store while the app is not running is the safest way to ensure changes will persist. However, it is not always necessary if you understand how and when Core Data reads and writes to the store.


Core Data tracks entity objects in memory but lazy loads the actual attribute values. The act of lazy loading is called faulting. If you modify an attribute value directly in the store and then a fault is fired for the corresponding managed object, the changed values will be loaded into memory. Managed objects will then persist in memory until no longer needed. Core Data assumes it has control of the store and will not attempt to load the managed object attribute values again until the object is invalidated and another fault is fired for it. So if you change a value after a managed object has already been populated for the record, the changes won't immediately appear. You will need to understand your managed object behaviour and lifetimes to work out when to expect the changes to be represented in memory.


Also be cautious not to make changes directly to the store while an app is running and then interact with the app in a way that commits changes to the database. If Core Data needs to update the record that you had modified, it will assume (rightly so under normal conditions) that it has exclusive control and will overwrite your sneaky changes with data from the in-memory managed objects.


Device Testing


Accessing the Core Data SQLite store directly is easiest when developing in the Simulator, as demonstrated above. However, it is still possible to access the store file on the device. The simplest way is to enable iTunes file sharing for the app. Then you can copy the sqlite file out to the desktop to interact with directly. You can also modify it and copy it back to the device.


Enable iTunes file sharing for the app by editing the Info.plist for the app and adding "Application supports iTunes file sharing" (aka UIFileSharingEnabled) with a boolean value of YES. Re-install the app and then connect to iTunes to get access to SQLite store file.


Summary


The use of SQLite as an underlying data store for Core Data is an implementation detail that can be used to our advantage when debugging and testing Core Data driven iOS apps.


Related


Also see: